
Home Alarm System Installation: What to Expect on the Day

The call comes in the morning. The owner wants the alarm fitted before work, the front room is still half-packed from a renovation, and the garage door has become the temporary dumping ground for every box in the house. That's normal on home alarm system installation day in Melbourne, and it's exactly why the best installs start long before a drill touches the wall.
A proper install isn't just hardware going up neatly. It's a property-specific job, shaped by floor plan, entry points, network access, sensor angles, and the way people live in the house. That's why professionally installed systems have moved from being a nice upgrade to part of mainstream residential fit-out, especially in new builds where 62% of new homes built in 2023 included integrated security alarm systems as a standard feature Zipdo's alarm industry statistics.
Table of Contents
Why Professional Installation Matters for Melbourne Homes
A homeowner in Balwyn might think the job begins when the alarm panel arrives. In practice, the work starts with the property itself, because a house with a long side path, a rear laneway, or an upstairs retreat doesn't behave like a catalogue floor plan. DIY kits often assume the walls are forgiving and the Wi-Fi is stable, while a professional installer has to deal with cable routes, sensor geometry, power access, and the fact that one bad placement can cause blind spots or nuisance alerts.
That difference matters because intruder alarms are not general household gadgets. The trade is a specialised installation role, with duties that include wiring, testing, commissioning, and handover, which is why formal building and electrical rules treat security work as a technical task rather than a quick weekend job BLS occupation dataset. In Australia, that technicality is reinforced by AS/NZS 2201.1:2007, which sets minimum requirements for construction, installation, operation, and maintenance of intruder alarm equipment Standards Australia product page.
Practical rule: if the installer can't explain where the blind spots are before mounting starts, the system probably hasn't been properly designed.
Melbourne homes also vary too much for one-size-fits-all fitting. A single-level weatherboard in Footscray, a renovated terrace in Richmond, and a newer townhouse in South Yarra all need different coverage logic, different cable paths, and different control-panel placement. That's why professional installation is less about “putting alarms in” and more about making the system fit the building it's protecting.
Professional home security versus DIY comes down to that design work. The panels can look similar on paper, but the difference shows up in how the system behaves after the first false trigger, the first power cut, or the first time someone forgets to shut a side gate.
Pre-Install Assessment and System Scoping
A proper installation starts on site, not over the phone. I want to see how people move through the house, where the entry points sit, where the modem and power already live, and which rooms really need detection or camera coverage. That first walk-through sets the scope, because an alarm that suits a compact Brunswick unit can be too small for a two-storey family home in Toorak.
What gets checked first
The assessment usually starts with the weak points you can reach without special tools, front door, rear door, sliding doors, windows near paths people use, and side access that gets overlooked when the household is busy. From there, I check the network and power setup, since app control, monitoring, and camera recording all rely on stable infrastructure. If the home is being renovated or pre-wired, cabling routes, sensor positions, and panel location should be decided before the walls are closed.
The property also decides the product mix. Some homes need a simple intrusion setup, others need intrusion sensors, cameras, smart access devices, and monitoring working together. For Melbourne customers, that mix can be drawn from systems built around Hikvision, Ajax, Dahua, Bosch, and Uniview, with package tiers such as Entry from $1,400, Plus from $2,050, and Complete from $2,800 PeakFriend Security service details. Those package levels matter because they show how coverage can be matched to risk without paying for hardware that will not earn its keep.
A written protection plan also keeps the job from drifting. If the brief is an intrusion system, I do not let it become a half-finished smart home project with loose ends at handover. That kind of discipline keeps the system tidy, easier to maintain, and easier for the owner to understand later.
The practical workflow is laid out in security systems installation, and it is useful for homeowners who want to see why the assessment is part of the job rather than a preamble.
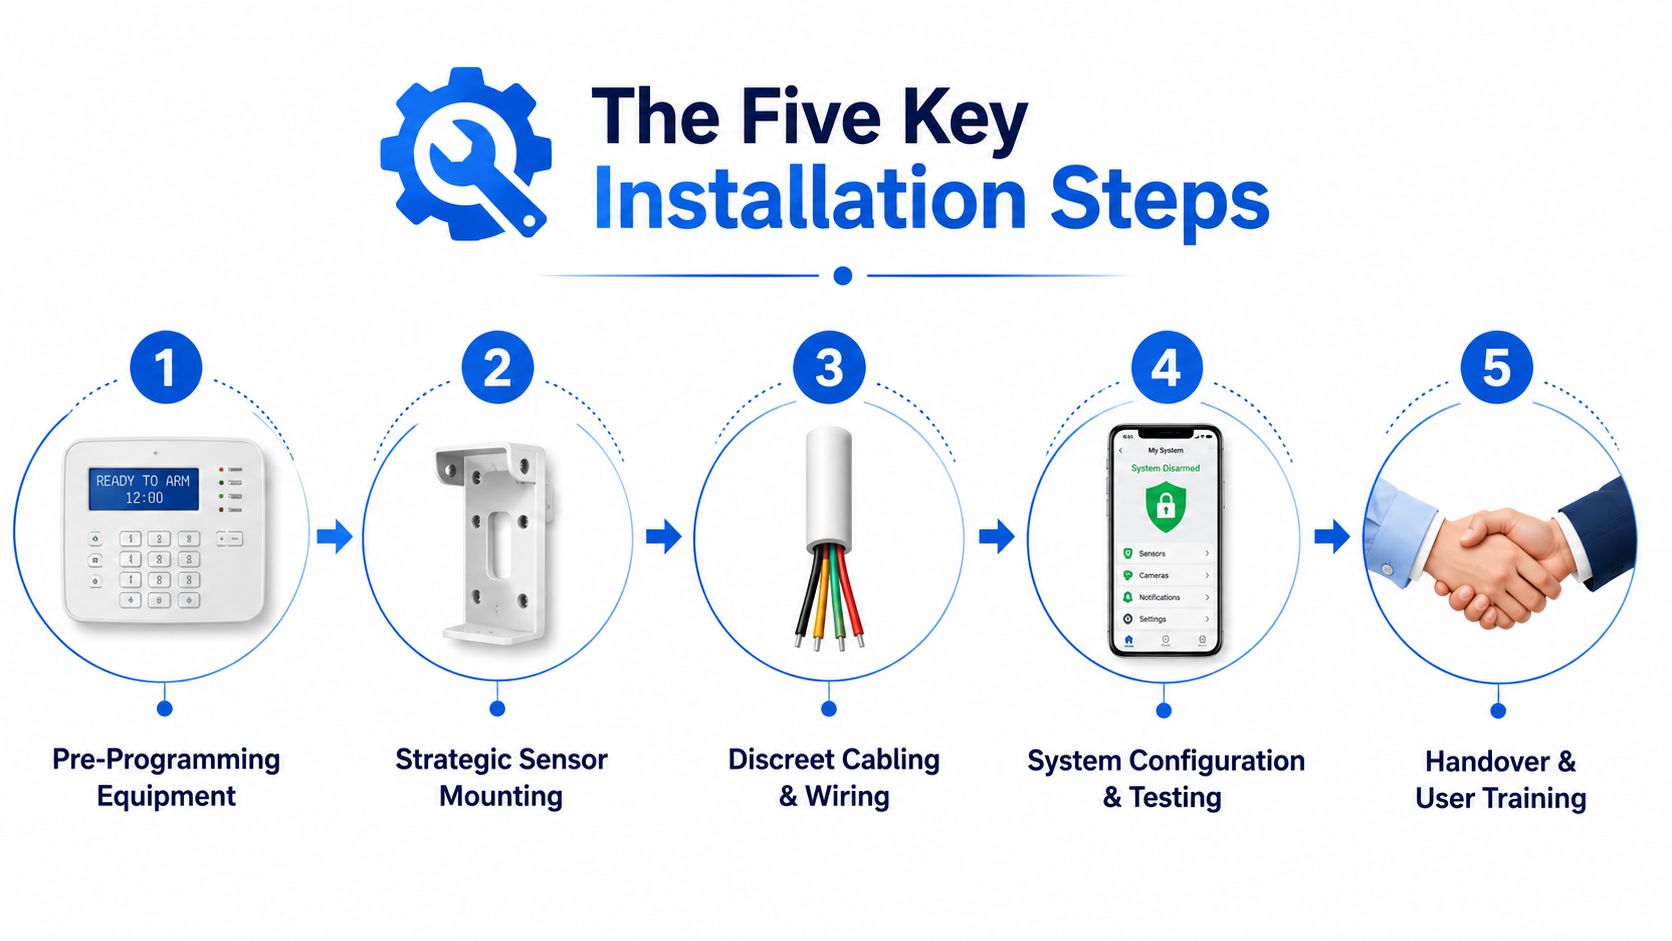
The Five Key Steps Technicians Follow on Installation Day
Installation day runs in a fixed sequence because rushing it creates problems that don't show up until the house is empty or the weather turns ugly. The five stages, pre-programming, mounting and positioning, commissioning, testing, and handover, are the backbone of a clean install. They also line up with the broader security workflow of planning, mounting, commissioning, and verifying every device before the site is signed off.
1. Pre-programming
Before the technician arrives, the equipment is prepared for the exact solution proposed to the homeowner. That means the panel, sensors, cameras, and app settings are matched to the property's layout so the onsite work starts from a known baseline. It saves time, and it reduces the chance of an awkward mismatch between what was promised and what gets installed.
2. Mounting and positioning
Experience shows. A camera that looks fine on the bench can be wrong by 20 centimetres on the wall, and that small error can shift the field of view enough to miss a side gate or catch too much sky. On one challenging two-storey Toorak home, a POE cable had to pass through the roof via a tiny space above a wine cellar to reach the network modem. The cable stayed hidden, the route stayed functional, and the finished result looked tidy because the install was adapted to the building rather than forced onto it.
3. Commissioning
Commissioning is the point where devices stop being separate parts and become one system. The technician connects everything to the main recording device, the VMS, and the control room setup where relevant. This is also where the logic of the system gets confirmed, not just the hardware.
4. Testing
Every device gets tested to make sure it triggers the response required for the solution. That means walking the perimeter, checking trigger paths, verifying alarm response, and making sure the system behaves the way the homeowner expects under real conditions, not only in a demo mode.
5. Handover
The last step is simple, but it's the one people remember. The homeowner gets shown the new system, how to arm and disarm it, what the alerts mean, and who to call if something doesn't make sense later. Without that final walkthrough, even a great installation can sit underused.

Calibrating Motion Sensors to Eliminate False Alarms
False alarms usually start with a placement problem the technician can spot in minutes on site. A sensor mounted too casually, aimed too far, or dropped into a room that works against it all day will cause trouble later. Hallways with sun glare, lounge rooms with heating vents, and doorways that face reflective surfaces all create avoidable nuisance triggers if the installer treats placement like a rough guess.
Angle and height matter
A proper setup starts with measuring the likely detection path before the sensor goes on the wall. Industry guidance commonly places PIR sensors about 2.1 to 2.4 metres above the floor, angled across likely intrusion paths instead of straight at entry points HowStuffWorks installation guidance. That height gives the detector a cleaner view of movement and reduces the chance that it reacts to every small change in the room.
Heat and airflow need the same treatment. Motion sensors should stay away from direct sunlight, HVAC vents, and reflective surfaces, because those conditions can mimic movement and cause nuisance activations HowStuffWorks installation guidance. In Melbourne homes, that comes up often in west-facing living rooms, houses with strong afternoon glare, and rooms where split-system heating pushes air across the detection zone.
A detector should watch a likely intrusion path, not stare at the front door like a nervous guard dog.
The same practical thinking applies across alarm devices. NFPA guidance for alarm-type detectors says nuisance triggers can be reduced by mounting devices high on walls or ceilings, keeping them at least 10 feet, or 3 metres, from cooking appliances, and avoiding windows, doors, and ducts where drafts can interfere with operation. It also notes that wall-mounted alarms should be within 12 inches of the ceiling NFPA installation and maintenance guidance.
Calibration is the part homeowners never see, but it decides whether the system feels reliable or irritating. The installer is not just finding a neat spot on the wall, they are setting the sensor to stay alert without training the household to ignore it.
App Configuration and Client Handover Process
A clean install still feels incomplete until the app is set up properly. On handover day, I want the homeowner to open the app, arm the system, check alerts, and understand what each control does without guessing. If that part is muddled, the job is not finished, no matter how tidy the cabling looks at the panel or sensor level.
What gets shown before the technician leaves
I set the system up on the homeowner's phone before I leave, then add the right users and confirm the core controls are working. After that, I run a live alarm test so they can see exactly what happens when the system trips, how the siren sounds, and how to disarm it correctly. That live rehearsal matters because people rarely remember button sequences once they are stressed, and a real run-through gives them a better reference than a quick explanation at the door.
I also leave something in writing. A custom instruction booklet makes the system easier to use later, especially in households with several users or in properties managed for family members, tenants, or trades access. A direct support number helps as well, because a confused owner will usually call before they start digging through app menus or trying to guess which setting changed.
For homeowners choosing a professionally installed system with app-based control, this wireless and wired home security guide can help explain the trade-offs before installation day. If the app setup is part of the service, the homeowner should expect the installer to handle it on site and confirm that notifications, access permissions, and monitoring links are all working as intended.
A proper handover also stops useful features from sitting idle. Video doorbells, smart locks, and remote access controls only pull their weight if everyone in the house knows who can use them and how alerts are reviewed. Without that, the system can end up as a collection of expensive hardware with a blinking light.
Designing Coverage for Multi-Level Properties and Outage Resilience
Split-level homes and townhouses demand a different mindset from the installer. A downstairs living area, an upstairs bedroom wing, and a garage or cellar each create separate movement patterns, so the system has to be designed floor by floor. A single motion sensor in the wrong place can leave a stairwell exposed or over-cover a room that gets used constantly.
Different levels need different logic
The control panel should go somewhere hard to reach, but also practical for power and network access. In many Melbourne properties, that means finding a position that doesn't create obvious attack points while still supporting stable connectivity. Sensors then get assigned by level, with entry points, transition areas, and blind spots considered individually rather than merged into one generic plan.
That matters in older suburbs where renovations have created awkward transitions, and in newer townhouses where vertical movement is concentrated through narrow internal stairs. The alarm should understand those patterns, not fight them.
Outage resilience is just as important. Alarm hardware, sirens, and monitoring pathways shouldn't fail all at once if the internet drops or power goes out. Backup batteries and cellular failover are the features that keep the system useful when the rest of the house is under stress, and that's particularly relevant in a city that sees severe weather and periodic grid interruptions. The ACCC's Measuring Broadband Australia program has repeatedly shown that fixed-line internet performance varies by technology and time of day, which is a reminder that app-dependent control can be affected by the home network itself ACCC Measuring Broadband Australia.
The right question isn't whether the system looks modern on the phone. It's whether it still behaves properly when the internet is patchy, the power flickers, or the homeowner's layout is more complicated than a standard floor plan. For households deciding between device styles, the differences between wireless or wired home security matter most when reliability and installation path both have to suit the property.
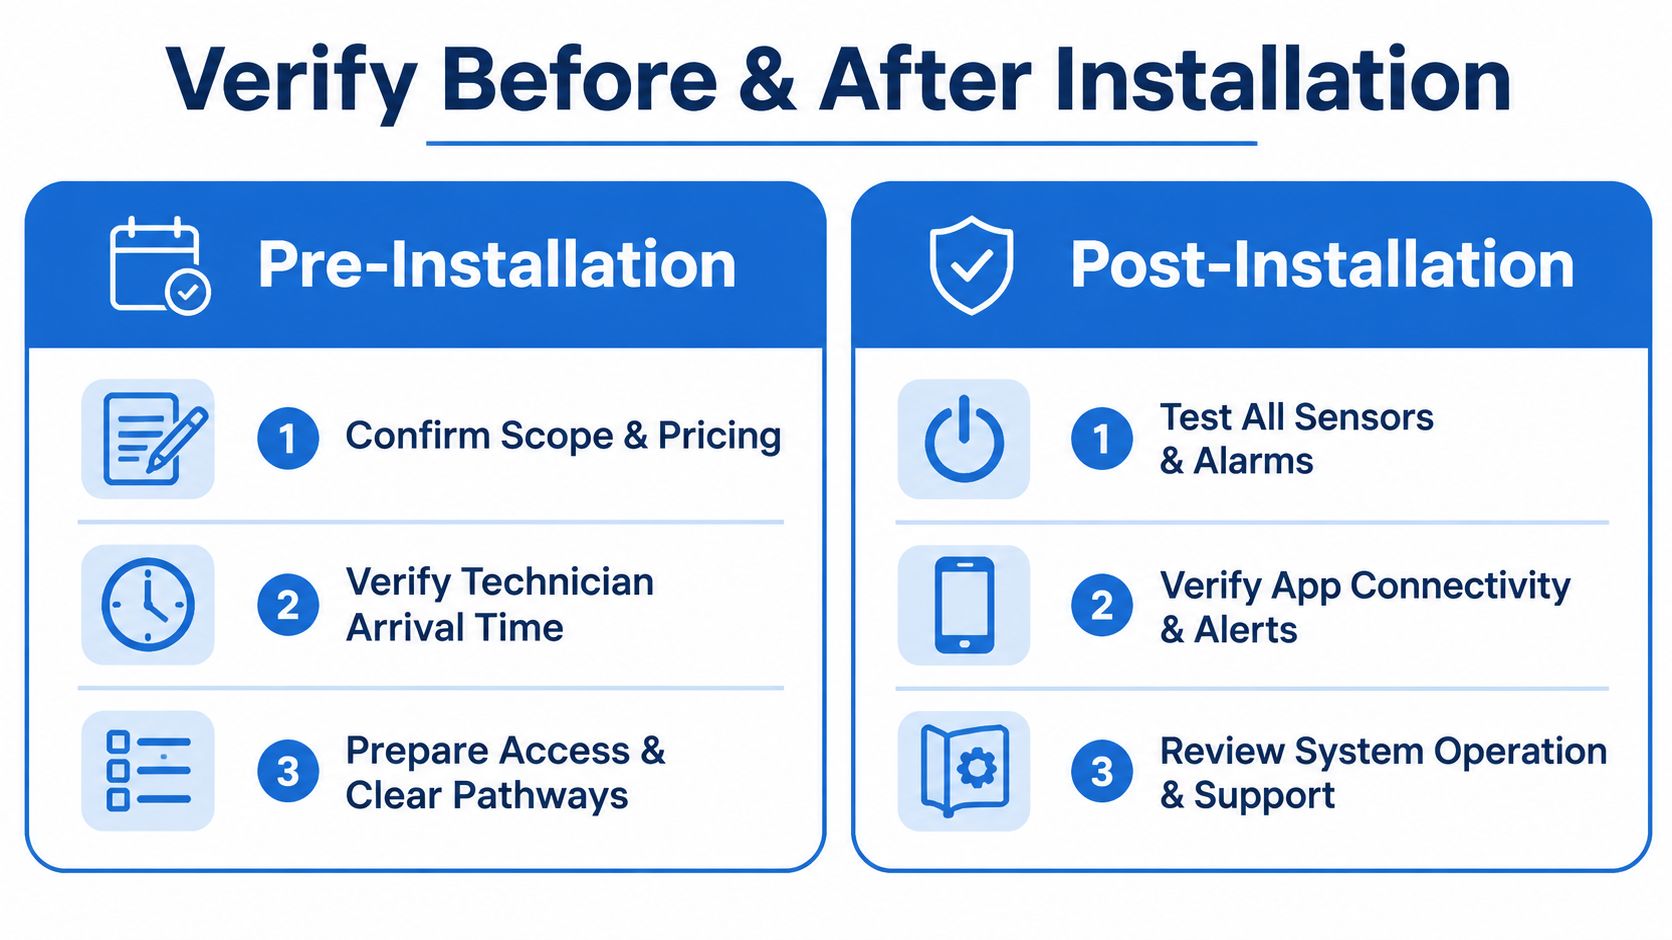
What to Verify Before and After Your Installation
A property can be ready on paper and still slow the job down on the day. The cleanest installs usually start with the simple stuff, clear access to the modem, switchboard, and planned cable paths, plus a short walk-through of what matters most in that house. If there's a rear roller door, a side gate, a cellar, or a room that stays vacant, those points should be identified before the first bracket goes up.
Melbourne homes often add their own complications. Older brick walls, tight roof spaces, long cable runs, and awkward access points can turn a standard installation into a bit of careful problem-solving, so the homeowner should know where the weak spots are before the technician starts drilling.
Before the technician arrives
A few checks make the day run cleaner:
Confirm scope and pricing: Make sure the quoted system still matches the property, the entry points, and the risks discussed during the assessment.
Clear pathways: Move stored items away from the modem, likely camera positions, and the cable routes the installer will use.
Flag key access points: Point out windows, side entries, garages, upper-floor openings, and any area that deserves closer attention.
Prepare network access: Have the modem available, along with any existing security gear the technician needs to inspect or integrate.
Share household routines: Mention pets, shift work, children's sleep areas, or regular trade access if they affect sensor placement or testing.
A good installer uses that information to avoid guesswork. It saves time, but it also reduces the chance of mounting a sensor in the wrong spot and then having to move it after the first test.
After the system is installed
The final check should be practical, not just visual. Cameras need the right height and angle, motion sensors should trigger cleanly, and the app should be tested with a live scenario so the homeowner can see exactly what an alert looks and sounds like. Cabling should be tidy, labels should make sense, and any access codes or user permissions should be handed over in a way that can be used again later without confusion.
The handover matters as much as the hardware. A homeowner should leave with support details, a clear explanation of what to do if a sensor misbehaves, and a basic understanding of which settings they can change safely and which ones should stay fixed. That conversation is where a rushed job gets exposed, because questions usually show up after the first night, not during the install.
Good signoff looks boring. Every device works, every alert lands where it should, and the homeowner knows how to use the system without guessing.
PeakFriend's service standards include punctual arrival, clear scoping, and leaving the site clean, which are the basics a homeowner should expect from any installer. Ongoing maintenance still matters, because sensors, batteries, and connections drift over time even when the original installation was done well. A system that gets tested once and then ignored is only half finished.
If you're planning a security upgrade in Melbourne, book a property-specific assessment and ask for a written plan before anything gets mounted. PeakFriend Security can assess the layout, install the system, set up the app, and walk you through the handover, so visit PeakFriend Security and organise the next step with a team that handles installation day properly.